During the last months, i was searching for an alternative, to all the different routers, and their closed-source firmwares.
You can’t know, if there is someone sniffing your traffic, passing through your router.
I want to to know where my data is being processed, and i don’t want any internet providers to capture, sniff or analyze any data, at least where i can prevent them of doing so.
Don’t mention all the locked options, like port forwarding.
We have to talk.
So i checked out some fancy hardware, so i have encountered the Lamobo Banana Pi R1, a router based Banana Pi running on the same SoC as the M1 Classic Pi.
The R1 is a open hardware router that can run on a variety of open source operating systems including OpenWrt, Android, and Bananian. The R1 has slim router form factor with a bay for 2.5″ HDDs. It also has 4 Gigabit LAN ports, 1 Gigabit WAN, and 300Mbs wireless N capabilities.
Banana Pi is an open platform device, it is for anyone who wants to play and build with developer technology instead of simply using consumer technology. Backed by our community, starting a project and building servers is fun and rewarding. We welcome all companies, DIYers, and tech loving people within our community! Together, we can make a difference, we can discover our passions, inspire others, and build a practical project.
Key features
- Allwinner A20 Dual-core 1.0GHz CPU
- Mali-400 MP2 with Open GL ES 2.0/1.1.
- 1 GB DDR3 memory.
- 1x SATA interface.
- 4x Gigabit LAN 1x Gigabit WAN
It costs around 50$ on most online auction houses like eBay or Amazon, and is really underestimated.
Most of the today’s routers have around 16MB up to 64MB of flash memory available, as well as 128MB up to max. 256MB of RAM.
Here we got a ton of available ressources to satisfy all our undisclosed desires.
![]()
What to consider?
Most of the available routers today have an included modem, depending on the type of connection you got at home.
They are deployed by the local internet providers, to work with according to the local requirements.
The Banana Pi R1 does not include any modem, only a WAN interface, but is it something bad?
Not really, it makes the Banana Pi R1 even more useful.
The only thing you need, in order to get this Router work with your internet access, is a modem.
In case of DOCSIS or Coaxial Cable connections, you need to connect the cable to the modem, and the RJ45 interface of it, to the Banana Pi’s WAN interface, and the work is done.
Getting started – Choosing an OS for your Pi
In order to get some working result we need to choose an operating system for our Banana Pi R1.
In this case we got an ARMv7 processor, with arm64 architecture, so we need to find a operating system, supporting this kind of processor.
The operating system will be written onto a microSD card, to be attached to the Banana Pi R1 later on.
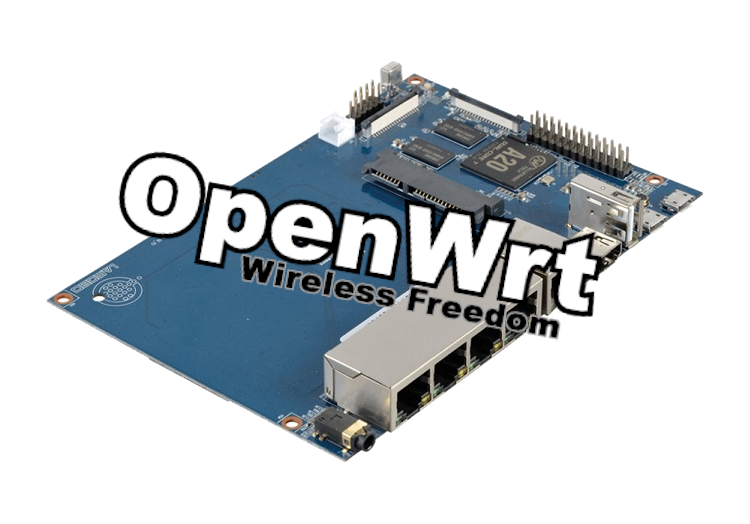
In our case we want a reliable open-source router firmware, which respects our privacy – So our choise will be OpenWRT.
If you are running a Windows system, you can look for pre-built Banana Pi R1 image files, to use OpenWRT, but in this case we want it to fit our requirements, so we’ll compile it from scratch.
First of all you need some packages in order to be able to compile this firmware.
On Debian/Ubuntu
$ apt install subversion build-essential libncurses5-dev zlib1g-dev gawk git ccache gettext libssl-dev xsltproc unzip subversion file
Now choose a folder of your choise, and clone the git.
$ git clone https://github.com/openwrt/openwrt
Now move into the newly cloned directory and proceed with the following instructions.
1. Run
$ ./scripts/feeds update -a
to obtain all the latest package definitions
defined in feeds.conf / feeds.conf.default
2. Run
$ ./scripts/feeds install -a
to install symlinks for all obtained
packages into package/feeds/
Now we want to configure the image, to fit our requirements.
In order to do so, we use
$ make menuconfig
The following GUI should appear now.
In order to proceed with the following steps, we recommend to check out the Banana Pi wiki page.

Here, we have to make several settings. In your case it may look different now, because here i have already selected the correct settings.
So in your case you may compare, if something differs.
First we have to select the target processor, or system, in this case, according to the wiki page, we got an Allwinner 20 CPU in this system, so we select the appropriate listing.
Do so to press enter to select the “Target System” menu.
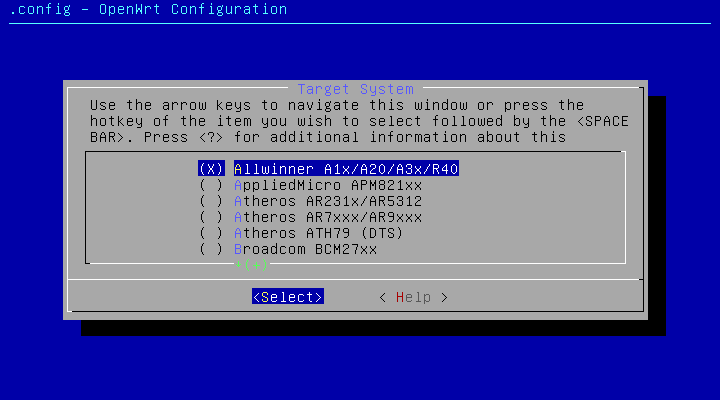
To get into the parent menu, press ESC 2 times.
We switch back to the main menu, now we have to select the target profile, easy to perform. In this case we got a Lamobo R1 (Well known as Banana Pi).

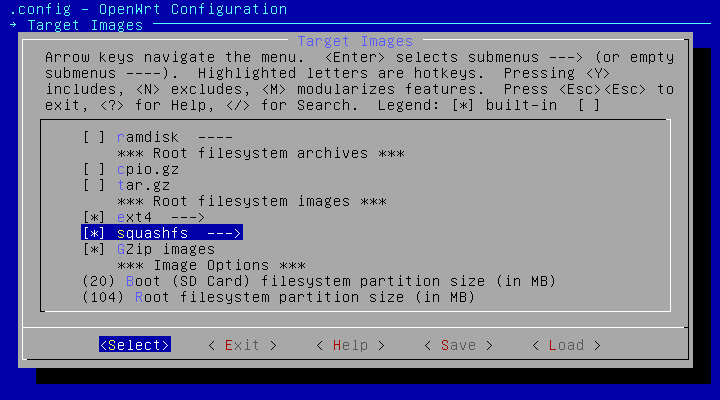
Now we need to enter the “Target Images” menu, in this case we want to use a R/W filesystem, in order to use it as NAS as well if desired.
So we need to select ext4, squashfs, and gzip can be removed to reduce building time of the image.
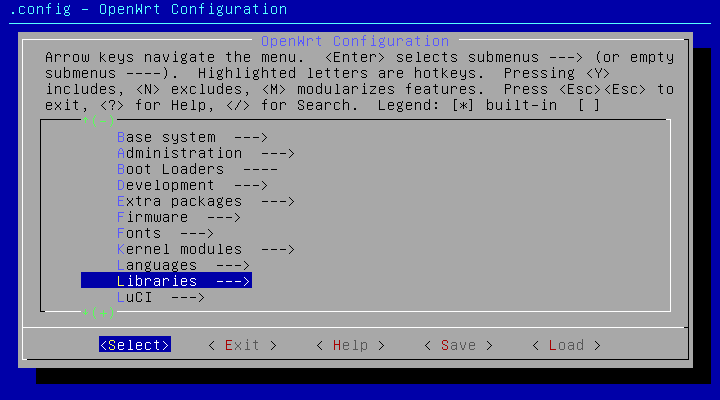
It’s useful to have a web interface as well to simplify the management of the router, especially for less experienced users.
So we need to return to the main menu, and select “LuCi”
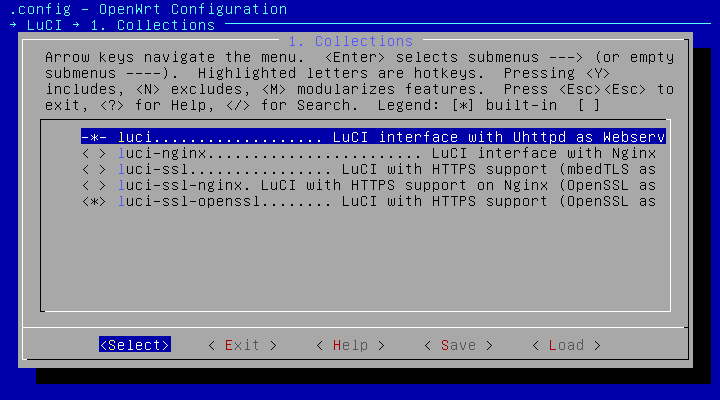
And enter “Collections“, and select luci, and OpenSSL, to provide HTTPS support.
The use of HTTP only is not recommended anymore, because of potential risks.
Attackers may be able to install harmful packages
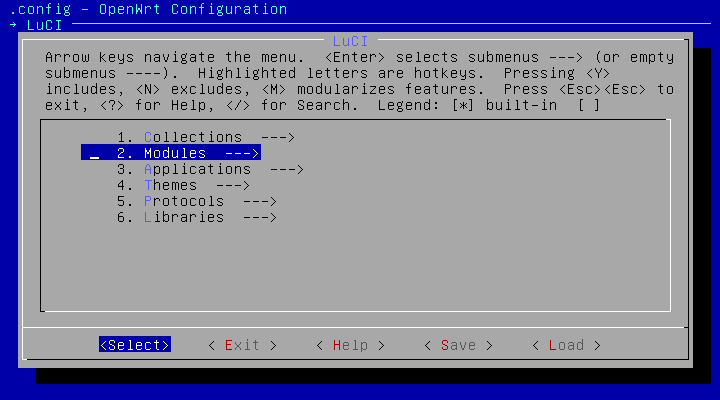
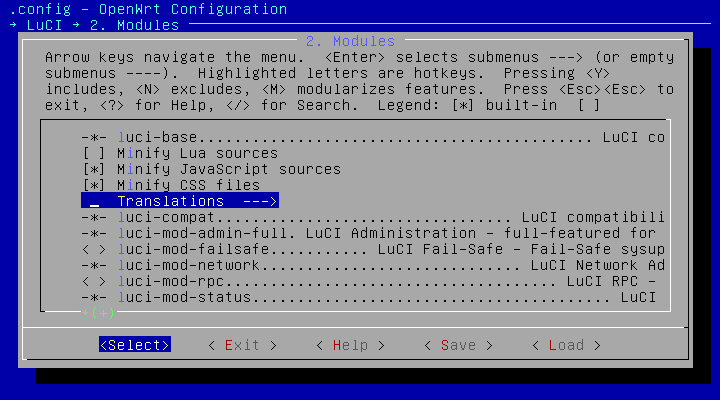
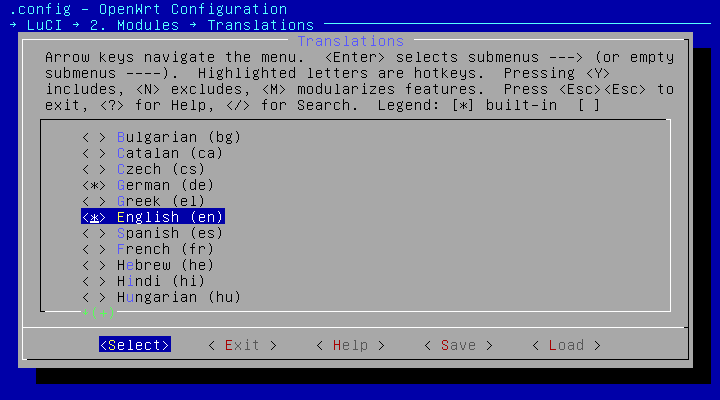
Now we go one menu level back, and select “Modules“, and “Translations“, to select the desired language of the web interface.
Now we are potentially done. If you want to customize your image even more, you can do so by checking out the other menus.
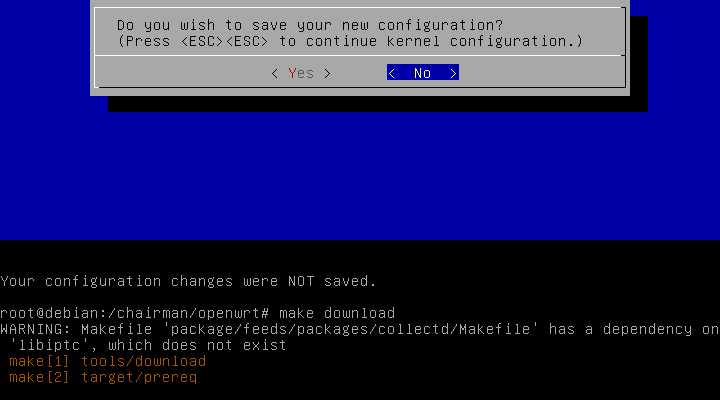
But in our case we our done with that. So we select “Save” and “Exit”
Now we have to download the packages in order to compile, using:
$ make download
After completing this process, you can build the image, easily by using:
$ make -j1
After having compiled successfuly, you can find the image in bin/targets/sunxi/cortexa7
Now insert your microSD card into your computer, and check out where it is located.
$ lsblk
In our case, /dev/sdb is our microSD card, our target.
$ NAME   MAJ:MIN RM  SIZE RO TYPE MOUNTPOINT
sda      8:0    0  267G  0 disk
├─sda1   8:1    0  217G  0 part /
├─sda2   8:2    0    1K  0 part
└─sda5   8:5    0 15,9G  0 part [SWAP]
sdb      8:16   0   16G  0 disk
sr0     11:0    1 1024M  0 rom
We’d like to use the ext4 image, so we perform the following command, in order to write the image using dd to our microSD card.
We use a blocksize of 32M to accelerate the execution of this command.
$ dd if=openwrt-sunxi-cortexa7-lamobo_lamobo-r1-ext4-sdcard.img of=/dev/sdb bs=32M && sync
After having finished. Perform:
$ lsblk
Now you should see partitions on your microSD card, but we want to extend the ext4 partiton on /dev/sdb2, to use all the available space.
$ NAME   MAJ:MIN RM  SIZE RO TYPE MOUNTPOINT
sda      8:0    0  267G  0 disk
├─sda1   8:1    0  217G  0 part /
├─sda2   8:2    0    1K  0 part
└─sda5   8:5    0 15,9G  0 part [SWAP]
sdb      8:16   0   16G  0 disk
├─sdb1   8:17   0   20M  0 part
└─sdb2   8:18   0 15,9G  0 part
sr0     11:0    1 1024M  0 rom
Extending OpenWRT partition
Using Parted (Advanced)
You can easily extend the partition size, using parted.
First you have install parted, using the package manager of your choise.
Then perform the following commands.
We suppose, our total SD Card size is 16G.
You have to adjust the size in your case.
$ parted /dev/sdb
$ GNU Parted 3.2
Using /dev/sdb
Welcome to GNU Parted! Type 'help' to view a list of commands.
(parted) print
Model: VBOX HARDDISK (scsi)
Disk /dev/sdb: 17,2GB
Sector size (logical/physical): 512B/512B
Partition Table: msdos
Disk Flags:

Number  Start   End     Size    Type     File system  Flags
 1      1049kB  22,0MB  21,0MB  primary  fat16        boot, lba
 2      23,1MB  132MB   109MB   primary  ext2

(parted) 2
  align-check TYPE N                        check partition N for TYPE(min|opt) alignment
  help [COMMAND]                           print general help, or help on COMMAND
  mklabel,mktable LABEL-TYPE               create a new disklabel (partition table)
  mkpart PART-TYPE [FS-TYPE] START END     make a partition
  name NUMBER NAME                         name partition NUMBER as NAME
  print [devices|free|list,all|NUMBER]     display the partition table, available devices, free space, all found partitions, or a particular partition
  quit                                     exit program
  rescue START END                         rescue a lost partition near START and END
  resizepart NUMBER END                    resize partition NUMBER
  rm NUMBER                                delete partition NUMBER
  select DEVICE                            choose the device to edit
  disk_set FLAG STATE                      change the FLAG on selected device
  disk_toggle [FLAG]                       toggle the state of FLAG on selected device
  set NUMBER FLAG STATE                    change the FLAG on partition NUMBER
  toggle [NUMBER [FLAG]]                   toggle the state of FLAG on partition NUMBER
  unit UNIT                                set the default unit to UNIT
  version                                  display the version number and copyright information of GNU Parted
(parted) resizepart
Partition number? 2
End?  [132MB]? 17,1G
(parted) print
Model: VBOX HARDDISK (scsi)
Disk /dev/sdb: 17,2GB
Sector size (logical/physical): 512B/512B
Partition Table: msdos
Disk Flags:

Number  Start   End     Size    Type     File system  Flags
 1      1049kB  22,0MB  21,0MB  primary  fat16        boot, lba
 2      23,1MB  17,1GB  17,1GB  primary  ext2

(parted) q
Confirming, if everything has worked.
$ lsblk
$ NAME   MAJ:MIN RM  SIZE RO TYPE MOUNTPOINT
sda      8:0    0  267G  0 disk
├─sda1   8:1    0  217G  0 part /
├─sda2   8:2    0    1K  0 part
└─sda5   8:5    0 15,9G  0 part [SWAP]
sdb      8:16   0   16G  0 disk
├─sdb1   8:17   0   20M  0 part
└─sdb2   8:18   0 15,9G  0 part
sr0     11:0    1 1024M  0 rom
Now we are done, and you can insert the microSD card into your Banana Pi R1 to get started!
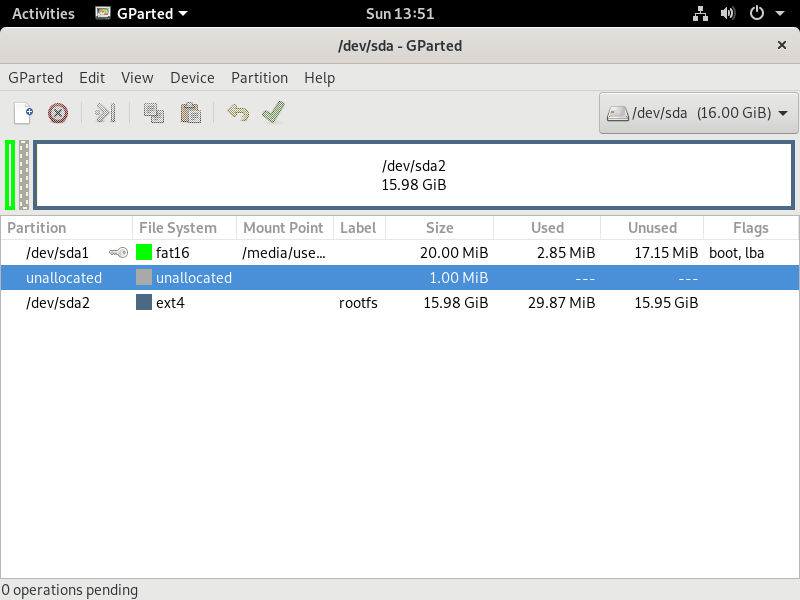
Using GParted (Recommended)
We start GParted, after having written the image, and select the USB device /dev/sdb
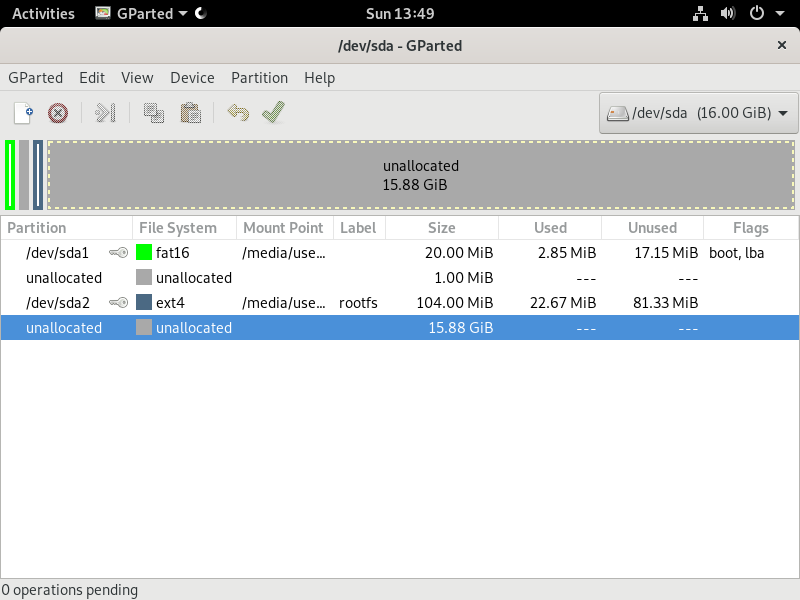
We select the “Arrow” and move the slider until the right edge.
Clicking “Resize“.
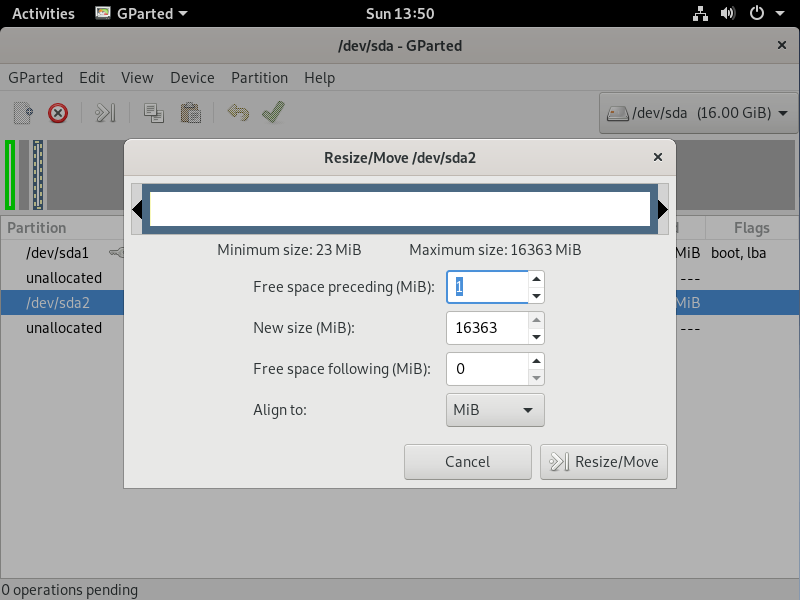
And “Apply” to perform the changes.
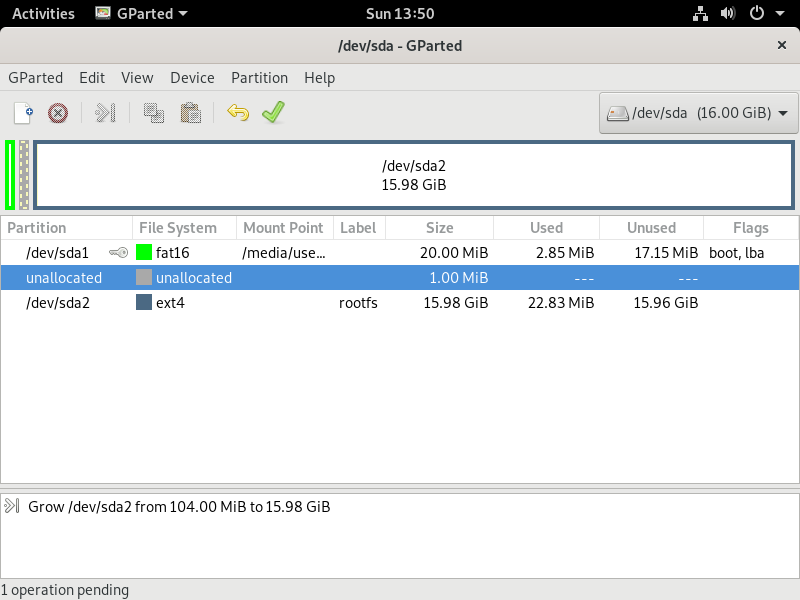
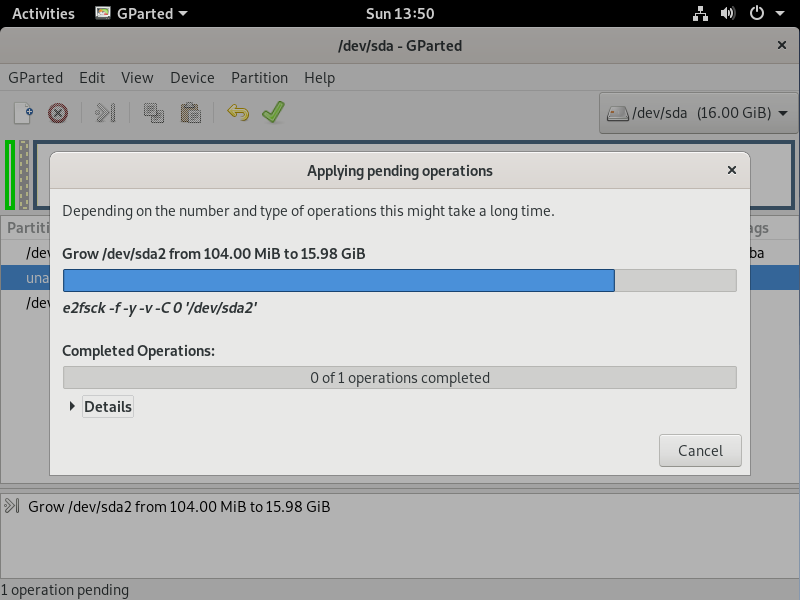
Everything is done now.
Now we are done, and you can insert the microSD card into your Banana Pi R1 to get started!
Getting Started with OpenWRT
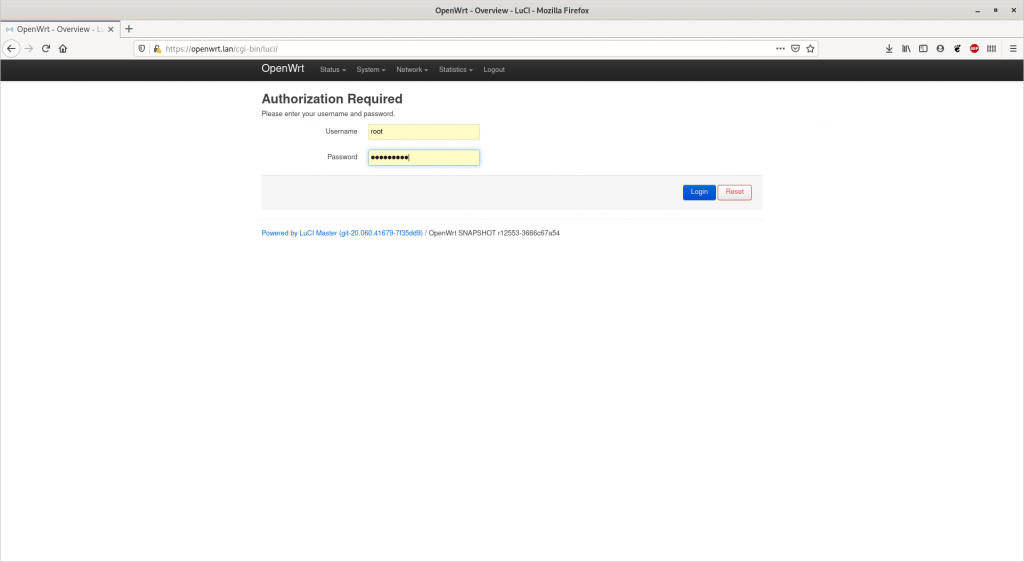
After having inserted the microSD card, connect the USB power connection, and wait.
After more or less 30 seconds, you can access the web interface, using “openwrt.lan” in the web browser of your chose.
When trying to log in for the first time, you don’t need to use any password, but you will be asked to set a password for security reasons.
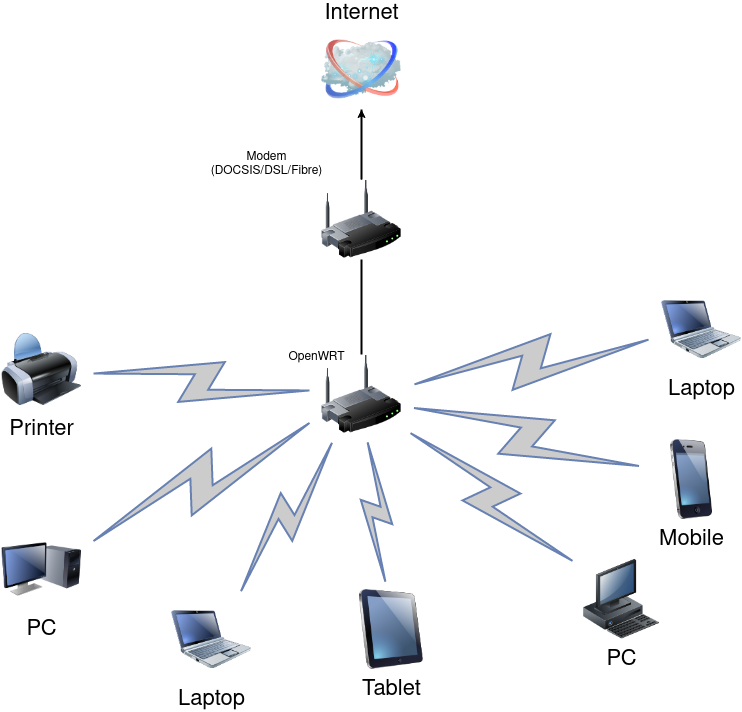
Now after having entered the interface, you see a quite useful overview of everything what’s going on your network.
In our case, we use the WiFi interface as WAN interface, which is connected to another WiFi network.
Acting like a WiFi Bridge.
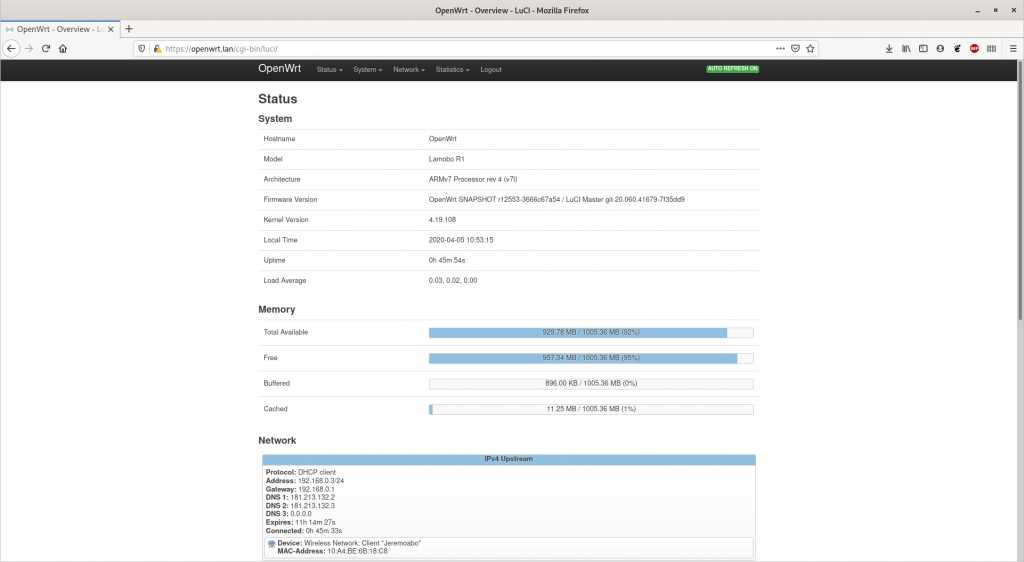
Feel free to customize all the settings, but default settings may serve for the most users.
So in order to create the network setup shown above, you don’t need to perform any changes.
Act like a network bridge
Just to show how things work, we would like to connect our OpenWRT device to another network, may be useful if you and your neighbour want to use only one network access.
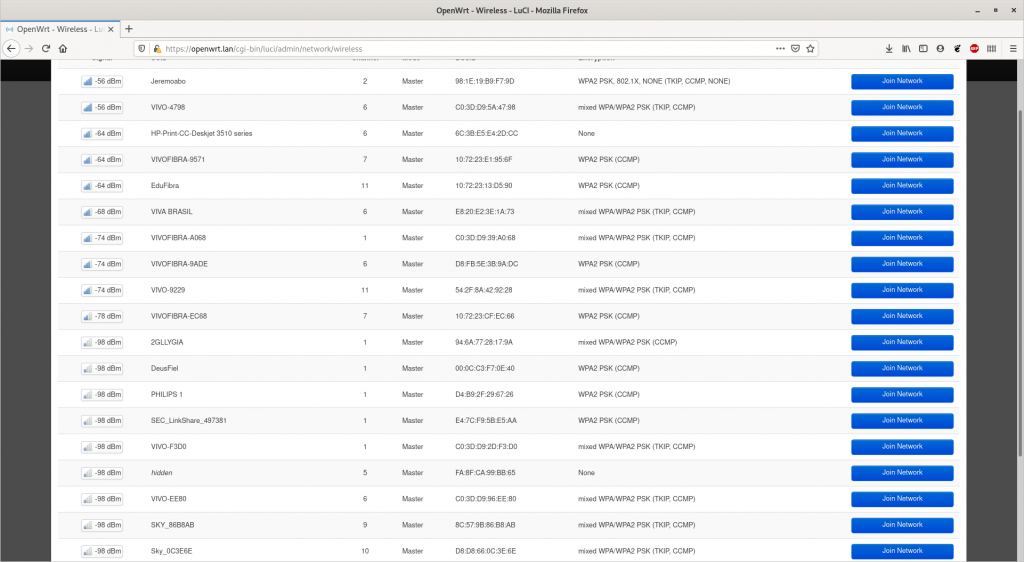
You go to Network –> Wireless and the Wireless radio will be shown, somewhat like 802xxx.
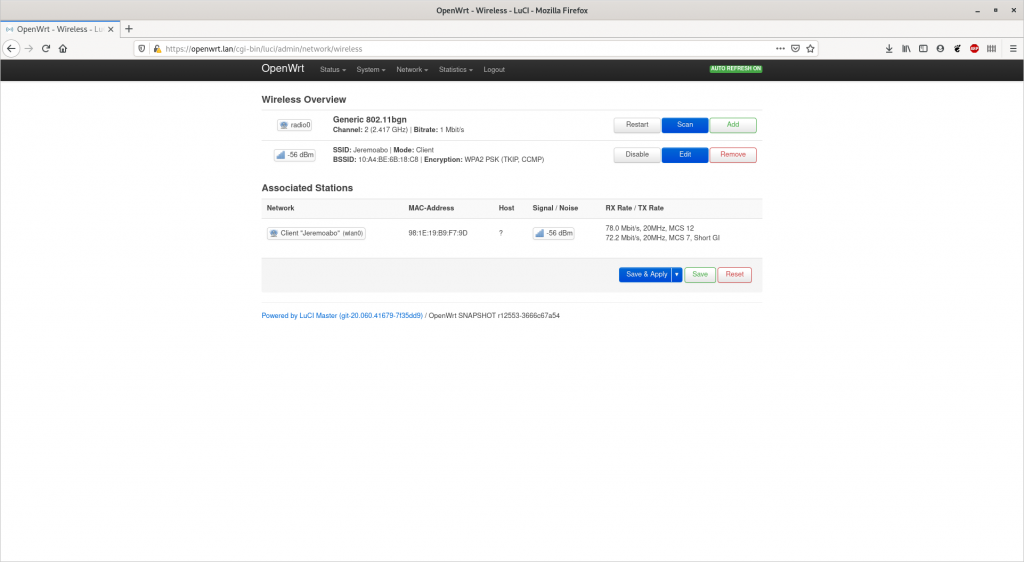
Therefore you can scan for wireless networks, and you should find your target wireless network, simply connect by using “Join network“.
Assign your wireless radio later on to your “WAN” firewall zone, to get internet access.
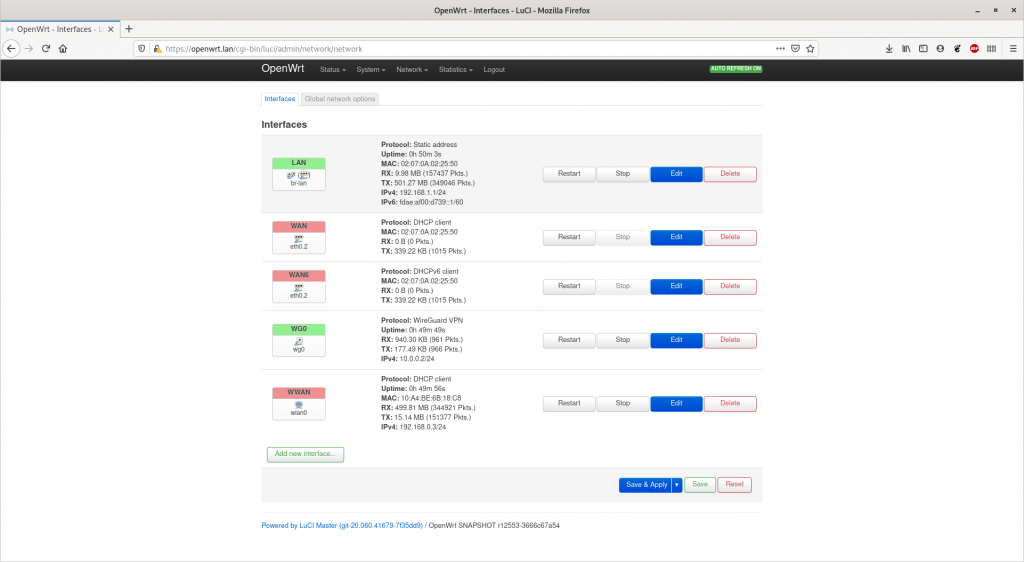
In our case we can use this little useful Pi to connect 2 remote networks, providing full routing on both side, to access each other, using a Wireguard VPN.
This was a quick overview, of how to use a Banana Pi R1 as a useful Router replacement, which respects your privacy, and fits all your requirements!
Next time we’ll explain more uses for this setup, like:
- Using as an adblocker
- Using as VPN client
- Using for DDNS services
- Using as PXE Server
- Using as Samba/FTP Server
If you’d like to retrieve further information check out the OpenWRT User Guide, or post some comments!
Thanks for reading, feel free to comment or to give suggestions.